One of the benefits of WordPress websites is that you can add so much functionality, by using plugins.
A WordPress plugin that’s on my “must have” list is the Yoast SEO plugin. (This article relates to version 1.4.x of the plugin.)
Now, I know that the Yoast SEO plugin does a heap of cool stuff, and the features I use are just the beginning. So there’s a lot more to it than this article covers. What I’m going to be talking about is specific to SEO website copywriting.
How to use the Yoast SEO plugin to help you with your SEO website copywriting
Using the Yoast SEO plugin for SEO website copywriting has two main stages:
- Inputting the focus keyword and meta data
- Analysing the content and making tweaks.
Let’s look at each of these in turn…
1. Input the focus keyword and meta data
First of all, you need a focus keyword (derived from your keyword research and keyword strategy). You need just one focus keyword for each web page or post.
As an example, let’s use screenshots from this actual blog post, where I’ve chosen “Yoast SEO plugin” as my focus keyword… That makes sense, yes? Seeing as this is an article primarily about the Yoast SEO plugin. (Oh, look at me dropping the keyword in yet again!)
(Note: “Yoast SEO plugin review” would probably be an even better keyword, but it’s kinda hard to write that naturally in the copy. The golden rule of website copywriting – even SEO website copywriting – is to write for human readers first of all. If something sounds stilted and awkward, don’t write it that way.)
You input your focus keyword in the “General” tab of the plugin window… which is on the same page of your WordPress admin as the page or post you’re writing, so all you need to do is scroll down.
The orange “1”, below, indicates where you put your focus keyword (and it even comes up with some suggestions… though personally I always ignore these!):

As you can see, the plugin automatically generates a Meta Title and Meta Description (see the orange “2”), but you should re-write these… you can do oh so much better!
(a) The Meta Title (called the “SEO Title” in Yoast)
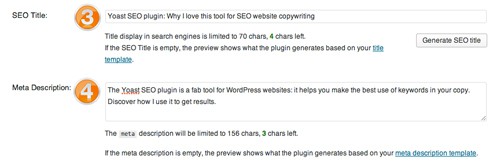
The Meta Title will show up in the search engine results, so you need to make this an enticing headline that grabs readers’ attention.
AND it needs to include your focus keyword… and you get extra Brownie Points if it’s at the very beginning.
AND you should stay within the 70 character word limit. (Something that’s a little too short is better than it being too long.)
AND every page on your website needs a unique Meta Title, or Google will penalise your site’s rankings.
You can see the Meta Title I’ve written for this article in the image below, next to the orange “3”:

(b) The Meta Description
The Meta Description may show up in the search results… or else Google may just use a random bit of text from your web page. Assume that it will show up.
Also, apparently according to Google, it doesn’t matter if you use your focus keyword in the Meta Description or not… but let’s face it, it’s not going to hurt. So I’d always suggest using it (as does the Yoast SEO plugin).
So here you can write a short (156 character max.) blurb. Make it a bit of a teaser; make it enticing so that people want to click through.
Do make the description accurate and relevant to your web page, too. And every page on your website needs a unique Meta Description.
You can see the Meta Description I’ve written for this article in the image above, next to the orange “4”.
Stick to the character count!
What’s super handy about this plugin is that a character count is included… there’s nothing worse than having your copy cut short in the Google search results. (That looks very unprofessional.)
And the character count saves you so much time, rather than using the word count in Word, and copying and pasting and all those shenanigans.
2. Analyse the content and make tweaks
OK, now that you’ve loaded your content and entered the focus keyword, Meta Title and Meta Description you can see how your content stacks up.
As soon as you hit “Save Draft” you’ll see some information come up in the “General” tab of the Yoast SEO plugin (highlighted in yellow, below):

… But it can do much, much more than that.
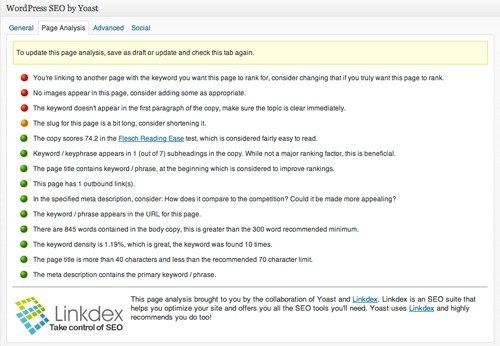
Click on the “Page Analysis” tab and you’ll see something like this:

As you can see, it uses a traffic light system to show you what you’ve done well (indicated by a green circle); important things that need attention (indicated by a red circle); and not-so-important things to consider (indicated by an orange circle).
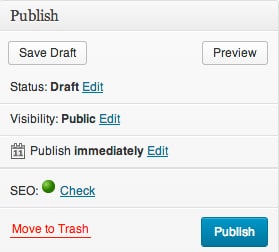
And if you look at the “Publish” pane, it gives an overall “traffic light” for the page:

… as you can see, I get a nice, big fat green light for this page. Woohoo!
Important: A green light isn’t a guarantee of success, it’s simply an indicator that you’ve done your job well. After all, the actual Google rankings have so many other variables, like degree of competition for your chosen keywords; your site’s overall Page Rank; number of quality inbound links to your site; etc. etc. But by getting a green light, you’re well on your way.
I’d also suggest that you set up your All Posts and All Pages admin areas to resemble this:

That way, you can see at a glance the traffic light ranking for each page; the focus keyword; and the Meta Data. Then you can quickly see which pages you’ve optimised well, and which pages need attention.
Do all pages and posts need a green light?
In my view, you shouldn’t worry about getting the green light for all your pages and posts… It just isn’t possible all the time.
Using the focus keyword should read naturally, and if you can’t possibly use the keyword naturally, then leave it be.
At the end of the day it is always better to write quality content for human readers than ticking all the SEO boxes.
What if you’re already using an SEO plugin, such as All In One SEO Pack?
At the time of writing this article (July 2013), the All In One SEO Pack plugin doesn’t come close to the Yoast SEO plugin.
One client paid his web developer to migrate the data from the All In One SEO Pack to the Yoast SEO plugin. Then I carried out an Analysis of all the web pages and blog posts, and made some small tweaks here and there to get that “green light” on as many pages as possible.
This resulted in increased website visibility for the client, and just a year after launching his brand new website (on a new URL), he is ranking naturally on Page 1 of Google for all of his chosen keywords. The Yoast SEO plugin definitely helped with that.
Other cool stuff that the Yoast SEO plugin can help you with
There’s a bunch of other stuff that the Yoast SEO plugin can do for your WordPress site, such as XML sitemaps, and a whole lot more… things that are far too technical for me, and that I get my web designer to look after. You’ll need to read the Yoast website to check out the rest of the features. 🙂
PS. A thank you…
A big thank you to my awesome web designer, Trisha Cupra at Blue Owl Web Design Makeovers for telling me about this fab plugin.


